XJ Cooling System Upgrades
By Steve Leslie
***DISCLAIMER
- Please note that this writeup reflects my experiences only and anyone using it
for reference or as a guide, etc. does so at their own risk. You may link to
this writeup, but you must obtain my permission to re-post it elsewhere.***
Synopsis
This writeup will cover cooling system replacement parts and upgrades. Although
these were installed in a 97 XJ, any Jeeps cooling system will benefit from
them. The work was pretty straighforward and there were no unexpected glitches
or "surprises" encountered. I did take my time though...total work time was
about 10 hours, but I stretched that out over two days.
History
and Objective
Since I bought the XJ new back in 97, it's always run at around 210 degrees
without deviation. Over the last year however, it has started running a little
hotter...as hot as 220- 225 degrees, especially in the summer. All this despite
the fact that the cooling system has been very well maintained. Because of this
I decided to upgrade from the stock 2 row, plastic radiator to a 3 row all metal
unit as well as add a transmission cooler. Everything else that was done was
based on a "while I'm in there I might as well" attitude.
Parts
Aquired
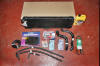
The following is the list of parts that were installed.
a) GDI 3 row, all metal radiator - obtained from
radiator.com
b) B&M transmission "supercooler" - obtained from
Jegs
Hi-performance (B&M part #70268 - 19,000 GVW, 11'' x 7.5'' x .75'')
c) New (not remanufactured) DuraLast Aluminum Water Pump - obtained from local
auto parts store
d) 180 degree, Hi flow thermostat - obtained from
TurboCity
(Model #640-110)
e) Hi flow thermostat housing - obtained from
TurboCity
(Model #640-130)
f) New viscous fan clutch - obtained from local auto parts store
g) New coolant sensor - obtained from local auto parts store
h) New hoses, clamps, antifreeze, radiator cap and serpentine belt - obtained
from local auto parts store
The
following tools were used for this project:
Instructions that came with each component
Factory Service Manual
3/8" drive Torque wrench (in/lbs & ft/lbs)
1/4", 3/8" and 1/2" drive ratchets, breakbars and sockets in metric and imperial
sizes
Open end and box wrenches (metric and imperial sizes)
Torx bits
Screwdrivers (flathead and philips)
Bench Grinder
Safety Goggles
Belt Tension Gauge
Pipe flaring tool
Dremmel Tool with wirebrush and polishing attachments
Mechanix Work Gloves
PB Blaster
Anti-Seize Compound
Thread Sealant Compound
Hi Temp Black RTV
Indian Head Gasket Shellac
Teardown
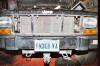
I started by pulling the XJ in the garage and disconnecting the battery. I then
removed the grill to give easy access to the petcock so I could drain the
radiator (also, it would allow for an easy installation of the trans
cooler....more on that later).
After giving it a little while to cool down I removed the radiator cap, attached
a hose to the drain, positioned a catch pan and and opened the petcock to let
the antifreeze drain out.
***Never open the cylinder block
drain plugs, radiator cap or open the petcock while the engine is hot or the
cooling system is under pressure. You're likely to burn yourself. Also,
antifreeze is poisonous. Children and animals are attracted to it due to the
color and odor. If you suspect a child has consumed any antifreeze, immediately
call 911 or your local poison control center. Make sure to dispose of it
properly.***
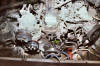
While the antifreeze was draining, I took the oppurtunity to remove the electric
fan and mechanical fan shroud. Each is held in place by two bolts into the
radiator crossmember on top (three of which also hold the overflow hose in
place) and by two tabs into a bracket on the radiator at the bottom. For the
electric fan, I disconnected the plug, removed the two top bolts and pulled
straight up on the unit to remove it. For the shroud, I removed the bolts,
pulled it straight up and placed it over the fan for the time being. Then, after
marking where the hood latch lines up, I removed the bolts that hold the
crossmember in and removed it.
Next, I removed the upper, lower and heater hoses. Then it was onto transmission
lines. The upper connection was threaded into the radiator, so after applying
generous amounts of PB Plaster, a line wrench took it right off. The lower
tranny line was a little different. It was actually molded into the radiator.
There was a "quick connect" fitting to connect the line to the radiator. Because
of space limitations, there was nothing "quick" about it...but after some
cursing it finally disconnected.
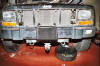
Now it was time to remove the radiator. Since the XJ has A/C, there is a
condenser that sits in front of the radiator and they are held together on top
with a bolted bracket and held together on the bottom with two dowels on the
radiator that go through a bracket on the condenser then into dowel holes in the
frame. I simply removed the bolts on top and pulled straight up on the radiator
to remove it. Then I removed the fan shroud (previously placed over the fan).
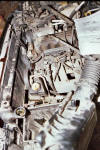
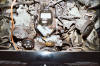
Now that there was some room to work, it was onto the front side of the
engine...
First, I removed the two bolts holding the thermostat housing on and removed the
thermostat. Then, I loosened (but did not remove) the 4 bolts holding on the
mechanical fan and the 4 bolts holding the idler pulley on the water pump (Since
the belt is holding tension on these pulleys, it's much easier to loosen them
prior to removing the belt). Then, after loosening the idler pulley bolt (under
the power steering pump), I loosened the belt tensioning bolt until the belt
could be removed and followed this by removing the mechanical fan and water pump
pulley. Now that all that stuff it off, it was time to remove the power steering
pump and bracket. There are three bolts that hold the pump to the bracket and
three bolts that hold the bracket to the engine...two to the water pump and one
to the engine block. Once these were removed, it was time to remove the water
pump. Four bolts and small tap with a hammer later the pump was off.
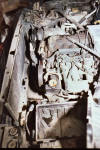
Prep and
pre-assembly
Now that everything was apart, it was time to clean it all up for the new parts.
After stuffing rags in the water pump and thermostat openings, I used engine
brite to clean off all the dirt and grime. Then I used a dremel tool to clean up
the mating surfaces.
Next it was time for some preassembly: First, I had to remove the heater hose
pipe from the old water pump and install it on the new one. So after I removed
it, I put it to the bench grinders wire brush to clean it up and then gave it a
few good coats of hi temp black paint. While I was waiting for the paint to dry,
I cleaned up all the bolts I intended to reuse on the bench grinder. I then
installed the freshly painted pipe onto the new water pump using thread sealant
to ensure a leak free fit.
Next, I removed the old viscous fan clutch from the fan by removing the four
bolts that hold them together and installed the new clutch on the fan. Easy. I
then moved onto the tranny line fittings for the radiator. It comes with plugs
in the trans cooler and all the hardware needed in a bag. This took a little
thought as to how I was going to run the aux trans cooler lines, but I decided
to just set it up to mimic what was on the old radiator, of course, using thread
sealant when installing the fittings.
Finally, I installed the new coolant temperature sensor into the new thermostat
housing. The threads on the sensor came with sealer already on them, so there
was no need to add any more.
Now, it was time to get all this stuff installed.....
Transcooler install
This was a peice of cake...namley cause I've installed one of these before
(actually I've installed 4 of these in various vehicles I've owned). It installs
in tandem with the existing cooler (built into the radiator) by going inline on
the supply tube from the tranny. So first, I needed to determine which line was
the feed from the tranny. On the AW4 (like most Chyco trannys), the rearward
line on the tranny is the feed...which translated to the lower line on the
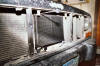
radiator. After figuring out all the hose routing, it was time to mount the
cooler. I installed it in front of the condenser, pretty much right in the
middle...which worked out well since it was dictated by hose routing.
The cooler installs with a sort of zip strip that goes through the fins of the
condenser. Pads keeps the cooler from damaging the fins.
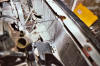
After running the hoses into the engine compartment, I attached them to the
cooler with clamps and mounted the cooler to the condenser. Then I cut off the
quick connect from the old radiator and flared the non quick connect end. I then
placed one hose from the cooler over the flared end, secured it with a clamp and
snapped the other end back into the quick connect. That's it...the other end of
the hose will get connected to the radiator.
Water
pump, Thermostat and Serpentine Belt
These are pretty easy too. On the water pump, I applied some Black RTV to pump
side of the gasket, put the gasket on the pump and then put RTV on the other
side of the gasket. Then, after dressing the bolts with thread sealer and
placing them through the pump to hold the gasket in place, I put the water pump
on, threaded the bolts in and torqued them to spec. Onto the thermostat....
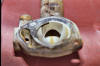
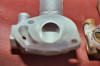
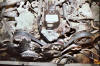
During the research phase of this project, I came across theTurboCity hi flow
thermostat housing. Normally, I look at stuff like this as snake oil...but since
I felt that the stock housing was restrictive anyway, I decided to snag one as
well as a matching hi flow thermostat. Total cost was less than $40 shipped and
after comparing it to the stock unit, I think it makes a difference....they say
pictures are worth a thousand words...you can clearly see how the ported housing
is less restrictive and how the new 'stat will allow more flow as well.
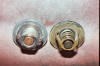
Anyway, the thermostat has an air vent hole that needs to be at the top. After
it was all snug in it's recess and in the correct position, the housing was
installed just like the pump...RTV on the gasket, thread sealer on the bolts,
torque to spec.
Then (just to get them out of the way) I installed heater hoses...one goes to
the water pump, the other to the thermostat housing. Next it was onto the
serpentine belt...
First, I reinstalled the PS bracket, followed by the PS pump (using anti seize
compound on all the bolts) and torqued them to spec.. Next, I installed the
pulley on the water pump as well as the mechanical fan getting the bolts snug.
Then, after routing the belt around it's proper path along the pulleys, I
cranked down on the tensioning bolt and using the gauge, set the belt tension to
spec. Then, I tightened all the remaining bolts to spec and laid the shroud over
the fan. Onto the radiator install....
Radiator
and final re-assembly
Pretty much the reverse of taking it out...the trick was getting everything to
line up correctly. After lining up the dowels on the radiator, with the brakets
on the condenser and the holes in the frame...the radiator dropped in. Then I
connected tranny feed line (from the new cooler) using a hose clamp and followed
that by installing the lower radiator hose (using Indian Head, of course). Then,
after applying thread sealant to the fitting, I attached the tranny return line
to the radiator. Next I atached the upper hose and bolted the crossmember back
in. This was followed by getting the fan shroud and aux. electric fan tabs to
line up and drop in. After running the overflow line back to the radiator the
final bolts went into place and the aux fan and temp sensor connectors were
hooked back up. At which point I filled the radiator with half prestone extened
life antifreeze/half water and installed the new radiator cap.
Then I reconnected the battery, started it up, checked for leaks and topped off
the tranny fluid.
In
closing...
I could not be more happy with this upgrade. As I stated at the start, the Jeep
has always run at around 210 degrees...even in cooler weather. Since doing this
upgrade (and driving a few hundred miles now), it has yet to hit that mark...as
a matter of fact it runs between 190 and 200 degrees now. That's a 10-20 degree
drop...a huge improvment. I would recommend similar upgrades to anyone that owns
a Jeep. To the folks with automatics, I highly recommend installing a tranny
cooler. Every 20 degrees you lower the transmission fluid temp, you will double
the life of the tranny....you can't beat that for $50 and getting your hands a
little dirty.

***DISCLAIMER -
Please note that this writeup reflects my experiences only and anyone using it
for reference or as a guide, etc. does so at their own risk. You may link to
this writeup, but you must obtain my permission to re-post it elsewhere.***