XJ
D44 buildup and install
Write
up and work performed by Steve Leslie
***DISCLAIMER
- Please note that this writeup reflects my experiences only and anyone using it
for reference or as a guide, etc. does so at their own risk. You may link to
this writeup, but you must obtain my permission to re-post it elsewhere.***
Synopsis
This writeup will cover the buildup of a Dana 44 out of an 87 XJ and the
subsequent installation of that axle into a 97 XJ. The axle recieved new alloy
shafts and a disc brake conversion. It was not regeared nor locked (both will
come at later dates). There's a lot that has been "glossed over" in this writeup.
If you have any specific questions on the work performed shoot me an email.
History
and Objective
After our March wheeling trip, the XJ was brought in for an alignment. When it
could not be dialed in correctly, the owner of the shop did some checking with a
tape measure and level bar and discovered that the drivers side tube on my 8.25
axle was bent. Total deflection was approximatley 1 inch. Rather than just
replace it with another 8.25, I began looking into upgrade options. A Ford 8.8
was briefly considered prior to settling on a D44 out of an 87-89 XJ.
Since this was an unexpected expense, after juggling some finances the decision
was made to install alloy axle shafts, do a rear disc brake conversion and
install a truss as well.
Some of the photos during the assembly were the first taken with a new (to me)
camera. The light meter on it reads incorrectly and the pics came out a little
underexposed.
Parts
Aquired
The axle aquired is a D44 out of an 87 Cherokee with 3.54 gearing. It is
completley open, which in the longer term is not an issue as it will recieve a
locker (and re-gearing) when the Jeep gets it's next lift. The axle shafts were
obtained from
Superior
Axle and Gear. New shaft bearings and seals were also installed as well as a
new pinion seal. For the disc brake conversion, I went with caliper brackets
from The
Streetrod Mfg., calipers (with e-brakes on the calipers) from an EL-Dorado
(among other GM vehicles), and rotors also from a variety of GM vehicles. Steel
braided lines from
Rubicon Express were used for the calipers as well as an extended line to
replace the stock line from the body to the axle. A Warn diff skid was also
installed and new 9/16"x8" Ubolts (thicker and longer than stock) were used to
secure the axle to the springs.
Coming soon for the axle will be a custom truss assembly from DozerDan that will
bolt on to the diff and weld onto the tubes.
The
following tools were used for this project:
Factory Service Manual
Floor jack and 4 Jack Stands
1/2" drive Torque Wrench (ft/lbs)
3/8" drive Torque wrench (in/lbs & ft/lbs)
3/8" and 1/2" drive ratchets, breakbars and sockets in metric and imperial sizes
(including 22MM)
Open end and box wrenches (metric and imperial sizes)
Bendix Drum Brake Spring Tool
C-clamps
BFH - 3lb
Rubber Mallet
Welding equipment (Flux Core welder was used)
Angle grinder with wire brush wheel
Bench Grinder
Vacuum Pump
Safety Goggles
Work Gloves
PB Blaster
WD-40
Anti-Seize Compound
Teardown
and Removal of axle shafts
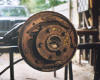
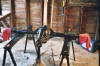
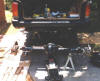
After removing the brake drums, it was time to remove the old brakes, axle
shafts and and backing plates. Before any of that though the axle was placed on
saw horses to help make it easier to work on.
First, the bendix tool was used to remove the main springs. Then the shoe
retaining springs were removed, allowing the shoes themselves to be taken off.
This was followed by removing the remaining hardware as well as the e-brake
cable, and the brake cylinder.
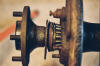
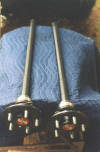
Next it was time to go after the axle shafts themselves. After applying copious
amounts of PB Blaster, the retaining bolts were removed.
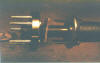
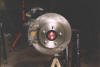
Then the highly speciallized and hard to find "beater bar" was used to actually
remove the shaft (this could also be done with a slaphammer but mine is
currently and mysteriously MIA, so I had to improvise). The bar was slipped
through the hole where the brake cylinder once was. After 2 or 3 firm taps with
a hammer the shaft popped right out
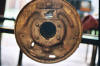
Finally the drum backing plate was removed by simply tapping it with a hammer to
remove it from the studs.
The same exact proceedure was used to do the other side of the axle.
Assembly
and disc brake conversion
The first step was to have the new bearings, seals and lugs pressed onto/into
the new axles. Rather then mess with this myself, I coughed up $30 to have a
local machine shop do it.
Now here's where the first problem occurred. While test fitting all of the parts
acquired for the upgrades, I found out that the hubs on the new axle shafts were
0.625" wider than the hubs on the stock shafts, 6.75" vs. 6.125. This would not
be an issue with drum brakes. However, the I.D. of the rotors is only 6.25", so
they would not fit over the new axle shafts. I solved this problem by having the
machine shop lathe 5/16" off the edge of each hub (another $30). This reduced
the O.D. of each hub to 6.125 (same as stock).
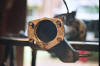
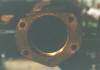
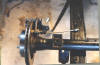
Next it was time to break out the wire wheel attachment for the angle grinder to
clean up the mating surface of the axle end.
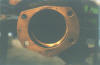
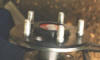
Then the new retaining studs were installed as well as the spacer plate. The
spacer takes the place of the backing plate to keep the proper preload on the
seal.
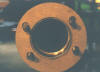
The axle shafts were then slid into the tube and the splines engaged.
Then a wood block and hammer was used to gently tap the bearing and seal home.
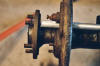
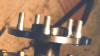
Next, it was time to install the brackets. The bracket system consists of a base
bracket, which bolts to the axle tube at the retaining plate and a caliper
bracket, which bolts to the base bracket with spacers inbetween. The caliper
bracket is spaced to the inside of the Jeep away from the rotor.
This took a lot of trial and error as they can install to orient the calipers in
a number of different positions and it took some time to figure out exactly what
position would be ideal for brake line and e-brake cable routing. In addition,
finding the correct spacing to use so that the caliper would fit over the rotor
corrrectly took additional time and patience.
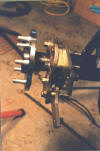
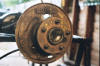
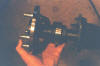
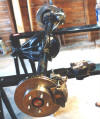
After everything was correctly fitted, it was time for final assembly of the
rotors and calipers. Pretty straightforward at this point, since it had all been
pre-fitted in the last step...slip the rotors over the hub, then install the
calipers onto the brackets and bolt them into place.
The axle with the completed upgrades.
After the brakelines retainers were welded on, the brakelines were run and the
diff cover skid installed...now it was time to bolt this thing into the Jeep!
Installation
This was pretty much a bolt in job, but axles are not exactly light and I was
doing this by myself...it was not too bad though.
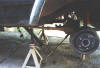
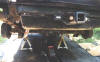
I started by jacking up the Jeep, chocking the front wheels and using jackstands
to support it at the "frame". The tires were then removed and it was time to
start unbolting stuff. First the shocks were disconnected at the axle. Then, the
e-brake cables were removed at the frame by loosening the tension nut until
enough slack existed to remove the cable ends from the housing. This was
followed by removing the drive shaft at the axle yolk (tape was used to keep the
cups from falling off the u-joint while it was disconnected).
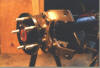
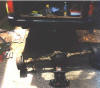
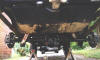
At this point I decided that I should probably start taking pictures.
 You can see all of
the above disconnected in this one.
You can see all of
the above disconnected in this one.
Next the rubber brakeline was disconnected from the hardline at the body (I put
a can down to catch the fluid as it dripped out of the line). Then, the bolts on
the diff cover were loosened and a catchpan was used to drain the fluid out of
the diff.
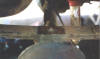
Now it was time to get ready to drop the axle out. First, a jack was placed
under the diff to support it.
Then the u-bolts and nutplates were removed.
At last the old, bent, POS 8.25 was dropped out of the Jeep. The drums and
brakes were removed to extract the e-brake cables for re-use.
Now it was time to install the new axle.
This was kind of an adventure lining it up on my own. What I ended up doing was
getting it under the Jeep using the floor jack and then setting it on jackstands.
I would then shift it around on the stands and reset the floor jack. After a
couple of resets I finally had it lined up and installed the new u-bolts/nutplates
as well as the shocks and connected the driveshaft and brakeline.
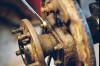
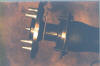
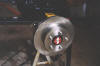
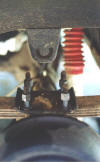
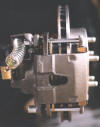
Now, it was on to the e-brake install. The parking brake is incorporated into
the caliper. You can see in this pic where the parking brake cable goes. The
cable runs through the spring and connects to the lever.
This step could not be skipped as the rear calipers adjust off the parking
brake. The rear calipers utilize a one way clutch inside the caliper pistons.
When the parking brake is applied the clutch senses when there is .030" or more
clearance between the friction material and the rotor on the inboard side. When
there is more than .030" the clutch turns inside the piston adjusting it out
keeping the rear brakes adjusted. If the parking brake is not set every time the
Jeep is parked, it will start to lose brake pedal (low and spongy) and the
adjuster mechanism will not work any longer.
Although, it sounds like it was really just a matter of installing the cables
onto the calipers...it was a bit more than that. The springs on the stock cables
have to be removed as they will bind up with the system on the GM calipers
(which was a PITA to do). In addition, the stock, drivers side cable is just
barely long enough to reach from the frame to the caliper when the axle it at
full droop. It will no longer reach when I lift the Jeep further, so I will
eventually need to have some longer ones made.

The final step was to bleed the brake system. Since most of the fluid had
dripped out of the main line, first I used a vacuum pump to draw fluid back to
the calipers. I started on the passenger side which is furthest away from the
master cylinder. While constantly checking the master cylinder fluid level, I
used vacuum to keep drawing fluid until no more air bubbles were present. I then
did the same for the drivers side.
Next, since calipers (especially rears) have all kinds of crevices that can trap
air, it was time for a gravity bleed. To do this I removed the caliper from the
bracket, then holding the caliper so that the flex hose was going up hill and
the bleeder screw was at the top, I opened the bleeder and tapped the caliper
with a rubber mallet a few times to knock any air loose. This procedure was
repeated for the drivers side.
After one more, quick bleed with the vacuum pump (and filling the diff with
synthetic gear oil), it was time for a test drive. There is a noticeable
increase in stopping power, although the pedal was a bit lower then it had been.
I'm going to keep an eye on how the rear pads wear over time to determine if I
can bring the pedal up by adding some residual pressure.
Proportioning feels fine and there are no weird pulls or anything, even under
hard/emergency braking.
Overall, I am very happy with the result...now I just have to git 'er offroad!

***DISCLAIMER - Please note that this writeup
reflects my experiences only and anyone using it for reference or as a guide,
etc. does so at their own risk. You may link to this writeup, but you must
obtain my permission to re-post it elsewhere.***