Front Brake Overhaul
by Steve Leslie
***DISCLAIMER - Please note that this writeup reflects my experiences only and
anyone using it for reference or as a guide, etc. does so at their own risk. You
may link to this writeup, but you must obtain my permission to re-post it
elsewhere.***
Synopsis
This writeup will cover a front brake overhaul, including: New brake pads, new
rotors, remanufactured calipers and bleeding the brakes. Although this work was
perfromed on a 97 Cherokee, the basics of a brake job are fairly common to most
front disc vehicles.
Parts aquired
All parts were purchased from AutoZone:
Duralast Gold brake pads - $31 for all 4 pads
2 - New Duralast Rotors - $40 per
2 - Remanufactured Calipers - $16 (+$20 core charge) per
Bottle of synthetic brake fluid - $5
Anti brake squeal - $2.50
Tools used
Hydraulic floor jack
Stand jacks
Metric and Standard size sockets, box wrenches, etc.
6" C-clamp
Oil catch pans
Vacuum pump/Brake bleeder
Disassembly
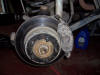
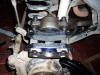
Start by jacking up the front end of the Jeep, support it with stand jacks and
remove the wheels. At this point, you'll be left with this:
The first thing that needs to be done is an inspection. The rubber lines should
be firm yet pliable and should have no obvious bulges, cracks, or leaks. Also
check the hard lines as well as the junction of brake lines. Check for grooves
in the rotor surfaces or any other evidence of uneven wear.
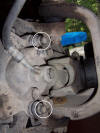
Next you'll need to compress the piston back into the caliper so after the new
pads are installed, it will fit back over the rotor. While it can be done later
(they even make a special tool for it), I do it first because helps the caliper
come off easier plus it just gets it out of the way. Besides, why buy a special
"caliper-piston-compressor" tool when 6" C-clamp does the job just as
well...plus it has so many other uses.

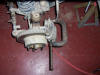
Just make sure that it doesn't crush anything (like the bleeder screw) and
slowly close the clamp until the piston is all the way in the caliper. It should
move smoothly and you'll end up with a good gap between ythe pads and the rotor
when you're done Basically, from this:
To this:
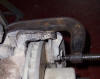
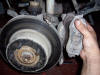
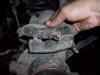
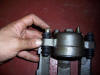
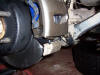
Now you're ready to remove the caliper. The picture below shows the caliper from
back. The 2 circles indicate the bolts that need to be removed. In some cases
these can be allen heads or even torx heads.
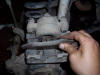
Once the bolts are removed, tilt the top of the caliper away from the rotor to
take it off. Be carefull not to twist, yank or kink the attached brakeline.
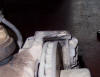
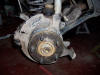
Once the caliper is out of the way, the rotor should just slip right off the
lugs...at least most of the time they slip right off. Depending on how long it's
been on there, the type of conditions you drive under as well as the climate of
where you live, It might have "grown attached" to the hub bearing and take a
little muscle or other persuasion to remove it.
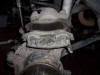
At this point (unless you're replacing them), you should take the rotors to a
machine shop to have them turned. Basically, they put them on a lathe and
machine the contact surfaces so that they are smooth and even. Not doing this
can result in eneven braking, vibrations when the brakes are applied, etc. They
will also measure the rotors to determine if they can be safely turned. If they
are under the minimum thickness, have excessive lateral runout, etc....you'll
need to buy new ones.
Now it's time to remove the pads from the calipers. Here's the starting point.
To remove the outboard pad pull up and slide the clips off of the caliper. Note
the location lugs on the pad as well as on the caliper. The new outboard pads
will have these as well to help ensure that the pad is in the correct position
in the caliper:
The inboard pad is held on the inside of the piston with clips. To remove it
just pull away from the piston (towards the outboard side):
If you are not replacing the calipers, skip ahead to installing the brake pads.
Installing calipers
The first thing that needs to be done is the slide bushings need to be removed
from the old caliper and installed in the boots in the new one. As the caliper
compresses/decompresses and as the pads wear, the bushings allow the caliper to
slide on them.
The pictures pretty much say it all on how to get them out.
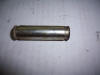
A closer look at the slide bushing reveals a lip on eiter end that the boot
needs to "snap" into. So when installing them in the new caliper, make sure they
are snug in their new homes.

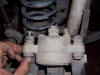
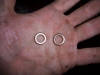
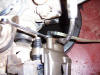
Now, onto the brake line. Each new caliper should come with two of these:
When you remove the bolt holding the brakline to the caliper the order will be
bolt head, washer, brake fitting, washer. Replace the two old washers with the
washers that came with the caliper. I did not get pics of this because I did it
quickly (to lose as little brake fluid as possible). Make sure you have a catch
pan and if you like your paint job, don't get and brake fluid on it....that
stuff eats paint. Here's the bolt that needs to be removed.

Brake Pads
If you were not replacing the calipers, you're in the right place. If you did
replace the calipers, go wash your hands and the get brake fluid off them...we
don't want that stuff getting all over the brake pads.
First figure out which pad is the inboard and which is the outboard. Then apply
some disc brake quiet/anti-squeal to the back of the pad.
DO NOT APPLY IT TO THE
FRICTION SURFACE!!!. Just put some on the back of the pad and spread it
around as evenly as possible.
When complete, it should look a little something like this:

Now, using the opposite of what you did to remove the pads from the caliper,
install the new ones (remember to make sure that the location lugs on the
outboard pad are lined up with the ones in the caliper):.
After the pads are in, you can install the rotor on the lugs, followed by
intalling the caliper. There are tabs at the bottom of the pads that you'll need
to line up in order for the caliper to slip on.
Now just reinstall the caliper bolts and tighten to spec.
Bleeding the brake
system
So if you didn't replace your calipers (or otherwise open up the system to the
air), you're asking why should you bleed your brakes? Just like any other fluid
in your Jeep, brake fluid should be changed every so often. One quality about
brake fluid is that it absorbs moisture, which not only makes the fluid less
effective...it lowers the boiling point. If the fluid boils, gas is released and
suddenly there's air in the line. Bleeding every so often (1-2 year intervals)
helps prevent this.
There's tons of writeups and methods for bleeding brakes (just do a google
search). I prefer to use a vacuum pump. It allows one person to do the job, and
there is no necessity to touch the brake pedal, allowing me to watch the master
cylinder (it should NEVER be run dry) as well as what is coming out of the
system. Also, like the c-clamp it serves other purposes besides just bleeding
brakes...it works anywhere you need to create a vacuum. You can pick them up at
most autoparts stores for around $50...I think Walmart even sells them.
Some people are going to chime in about speed bleeders which are very sweet and
make quick work of bleeding brakes...but if you're like me and have 4 vehicles
to maintain, consider buying a set of speedbleeders for each one at around $50
per vehicle. Then compare that to a $50 vacuum pump that has other uses as well.

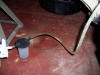
Anyway, back on point...this is the vacuum pump in the configuration used for
bleeding brakes.
A few general rules first, always start at the wheel with the longest hydraulic
line to the master cylinder and work around the vehicle to the shortest. For us
here in the States it would be right rear, left rear, right front, left front.
Never let the master cylinder run out of fluid, so make sure to have plenty on
hand. Also, don't re-use the fluid...would you drain the oil out of your engine
and then turn around and pour it back in?
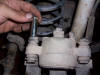
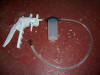
The process itself is simple but time consuming, connect the end of the hose to
the bleeder screw, use the pump to create a vacuum and then slowly and slightly
open the bleeder screw:
Check the master cylinder often and add fresh fluid as necessary. When the fluid
runs clear and you see no air coming out of the line, close the bleeder screw
and move on the the next wheel in sequence.
After all four corners have been bled, start the vehicle and step on the brake
(you might have to pump them to compress the new pads onto the rotors and bring
the pedal up), then turn off the engine and hold the pedal down. If the pedal
does not sink after 15-20 seconds, you're set. If the pedal does sink, the
system should be bled again.
Once that's done, install your wheels and take the vehicle for a test drive, but
go easy at first. If something is going to fail, it will most likely be right
away. Besides, you don't want to glaze over your brandie new pads.
Stoppin' on a dime,
Steve
***DISCLAIMER - Please note
that this writeup reflects my experiences only and anyone using it for reference
or as a guide, etc. does so at their own risk. You may link to this writeup, but
you must obtain my permission to re-post it elsewhere.***