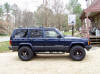
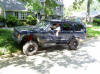
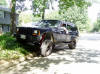
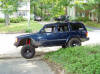
2000 XJ 3" Skyjacker Lift
By Allen Manley
Installation performed by Allen Manley, Dale Majka and Steve
Leslie
Kit comes with:
4 - 3" Skyjacker Hydro-Shocks
2 - longer LCA's (Lower-Control Arms)
1 - Track-Bar Relocation bracket
2 - 3" Coil Springs
2 - AAL's (Add-A-Leafs)
Added accessories:
4 - BPE's (Bar-Pin Eliminators)
Necessary Tools List:
Instructions that came with each of the components
Factory Service Manual
Floor jack and 4 Jack Stands
1/2" drive Torque Wrench (ft/lbs)
3/8" drive Torque wrench (in/lbs & ft/lbs)
3/8" and 1/2" drive ratchets, breakbars and sockets in metric and imperial sizes
(including 21MM)
Open end and box wrenches (metric and imperial sizes)
Drill with 5/16" and 3/8" bits
Ball joint separator (a.k.a. forkbar or pickle fork)
BFH - 3lb
Spring Compressor
3/8" Thread tap
Angle Grinder
Bench Grinder
Safety Goggles
Work Gloves
PB Blaster
WD-40
Anti-Seize Compound
*** DAY 1 *** - START TIME: 09:30 ET
NOTE: BEFORE STARTING INSTALL, HOSED DOWN ALL
BOLTS WITH P.B. BLASTER AT LEAST 48 HOURS PRIOR, AND AGAIN 24 HOURS BEFORE
INSTALL.
Preliminary Work:
1: Locked parking brake, jacked up the XJ in the front, blocked the rear tires,
set up jack stands, and took off the front tires. Read through instructions
thoroughly. Double-checked all parts lists for screws, bushings, brackets,
etc... Reviewed all necessary tools like socket sets, power tools, cigarettes,
wrenches, drop cloths, diet coke, etc...
Front-End Assembly Prep:
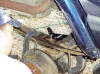
2: Disco'ed the front sway bar. Also removed the bottom pins to the discos from
the assembly and tied back the discos at the top. This gave us more room to work
with all around.
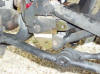
3: Using the fork bar, removed the drag link from the pitman arm to lower the
front down. Also disco'ed the track bar to give us even more room to work with.
(Remember to save the cotter pin on the drag link if possible.)
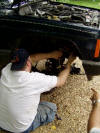
Left Side Front:
4. Jacked up the front diff to support the weight of the axle. Unscrewed the
coil spring from the base. Lowered the axle with the jack to try and get more
room. Not enough space yet to pull out the spring.
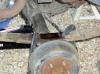
5: Removed the bolts from the shock base and the top bolt under the hood. Pulled
out the shock and tossed it aside
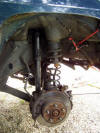
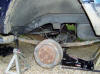
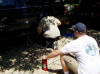
6: Came back to the coils, still couldn't get them out. Noticed the 2" spacer on
top of the coil from previous BB. Grabbed the coil compressors and clamped down
the spring just enough to stand on the rotor and pull it free. Uncompressed the
spring and tossed it aside.
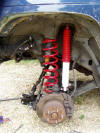
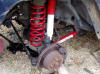
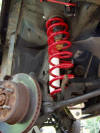
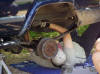
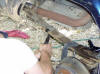
7: Grabbed the 3" coil. Compressed it down to where it was just enough to NOT go
in. Stood on the rotor and "bounced" the spring into place. Opened up the
compressor and marvelled at our handiwork. Raised the jack back up to support
the weight of the axle and keep the spring in place.
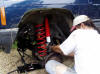
8: Assembled the shock. Measured the BPE in the old shock socket to see how it
would fit in. Had to grind down one edge of the BPE with the bench grinder to
get it to fit and align itself to the bottom holes evenly. Attached the BPE to
the socket nice and snug.

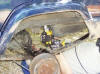
9: Attached the shock to the BPE. Stretched the shock to fit in up top. Took a
nut, bushing, and the top shock dish and tightened the shock to where most of
the bushing was pressed into the wheel well (pre-loaded).
10: Went for a pizza.
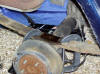
(1 SHOCK W/ BPE AND 1 SPRING IN PLACE...)
Right Side Front:
(Same as above, except for the pizza)
(2 SHOCKS W/ BPE'S AND 2 COIL SPRINGS IN PLACE.)
Left and Right LCA's:
14: Placed jack under the front diff to support front axle. Removed bolts to LCA
and extracted old LCA. Tossed it aside. (Repeat
for Right Arm)
15: Placed zerks into LCA arm and lined up zerks to bolt holes for easy access
with grease gun. Bolted LCA arm in place.
(Repeat for Right Arm)
(TWO LCA'S INSTALLED)
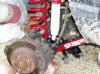
Front-End Assembly
Completion:
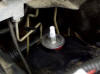
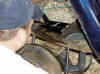
11. Placed the bracket for the track bar relocation into the same socket that
the bar was previously on. Drilled hole into bracket to mount track bar to the
bracket (must be done due to variance in assembly).
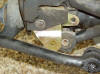
12. Jacked up the front diff to give support to reattaching the drag link to the
pitman arm.
Turned on the Jeep and moved the wheel back-and-forth to realign the drag link
to the pitman. Had to continue to move the wheel to align the track bar hole up
to the new bracket. Tapped lightly with hammer to assist in alignment.
13. Re-attached the cotter pin and nut to the drag link and tightened down the
track bar. Also tightened up bolt to the drag link.
(TRACK BAR RELOCATION COMPLETE. DRAG LINK AND PITMAN ARM REATTACHED)
16. *** TORQUED DOWN ALL BOLTS TO FACTORY SPECS.
DOUBLE-CHECKED ALL PARTS FOR INSTALLATION AND TIGHTNESS. ***
17. Put on front wheels and removed jack stands. Lowered Jeep to the ground.
*** FRONT-END HARDWARE INSTALL COMPLETE @ 17:00
ET ***
Rear-End Assembly Prep:
18: Jacked up rear end, blocked front tires, set up jack-stands, and removed
rear tires. Detatched brake lines from underbody to allow axle room to move more
freely.
19: Used P.B. Blaster for bolts not easily reached when the tires were on.
20: Removed top bolts to all four shocks. Broke three bolts in the process.
Removed shocks from bottom bolts and tossed them aside. Assembled new rear
shocks to prep for install.
21. Was about to start on rear shackle removal when report of heavy storms
moving into the area halted work for the day. Secured all tools and called it a
night.
*** END DAY 1 *** - END TIME: 17:35 ET
*** DAY 2 *** - START TIME: 10:15 ET
Shock Placement:
22. Started with drilling out broken factory screws from the body. Drilled out
all three holes with titanium-pointed drill bits. Had to sharpen and lube bits
repeatedly during procedure.
23. Tapped new bolt holes into the three drilled sockets. Installed BPE's into
the shock sockets and attached shocks to BPE's (no grinding was required, both
BPE’s fit in perfectly). Left shocks hanging down.
Rear Shackles:
24: Since 2" budget kit was already installed, removed BB rear shackles and
replaced them with original shackles.
(REAR SHACKLES PUT BACK ON SUCCESSFULLY)
AAL Install: Right
NOTE: DID NOT HAVE TO REMOVE LEAF-PACK
COMPLETELY FOR AAL'S.
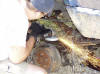
25. Placed c-clamps on either side of center pin, about 6 - 8 in. across for
breathing room.
26. Placed jack under rear diff to support leaf-pack and lifted rear. Removed
ubolt plate and both ubolts.
27. Using pliers, removed the three lock-bands off of the leaf-pack.
28: Using the angle grinder, cut away the top part of the center bolt of the
leaf-pack. Lowered axle to expose center bolt bottom and the lower part of the
pack.
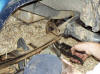
29. Pulled out AAL and measured center-hole placement. Noted that the AAL would
need to be fitted between the top and second leaves in the pack.
30. VERY CAREFULLY AND EVENLY... LOOSENED
C-CLAMPS ONE TURN AT-A-TIME UNTIL BOTTOM PART OF LEAF-PACK CAME AWAY EASILY.
31. Positioned AAL into leaf-pack between the first and second leaves and
threaded hole with newly provided bolt.
32. Jacked up axle just enough to align leaf-pack with thread bolt. Replaced
c-clamps on either side of bolt.
34. EVENLY TIGHTENED CENTER BOLT FOLLOWED BY
EVEN TURNS ON C-CLAMPS UNTIL PACK IS RECOMPRESSED TOGETHER. TAPPED LEAF-PACK
WITH HAMMER LIGHTLY TO ALIGN LEAF-PACK HALVES PROPERLY.
35. Cut down remainder of center bolt with angle grinder. Kept fire extinguisher
ready for any possible fire problems (center bolt had been sprayed down with P.B.
Blaster).
36. Using pliers, reattached lock-bands tightly around leaf-packs. Made sure
they were placed back in their original positions on the pack.
37. Lifted axle up to align rest of assembly together. Reattached ubolts and
ubolt plate to axle and leaf-pack.
38. Torqued down rear shackle bolts and spring-eye bolts on leaf-pack.
39. Attached rear shock to axle assembly and tightened bolt.
(1 AAL AND 1 REAR SHOCK IN PLACE...)
AAL Install: Left
(Same as above)
(2 AAL'S AND 2 REAR SHOCKS IN PLACE...)
40. Lifted rear axle and reattached tires. Removed jack-stands and lowered
vehicle. Went out for Subway subs.
*** REAR-END HARDWARE INSTALL COMPLETE @ 16:15
ET ***

Assembly checklist:
41. Reattached lower part of quicker discos and hooked discos back on.
42. Greased all greasable points under the front chassis.
43. Checked and torqued down all bolts along chassis to factory specs, even the
one's we didn't touch.
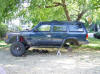
*** SKYJACKER KIT COMPLETE AT 17:10 ET ***
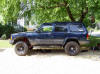
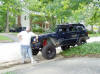
44. Took Jeep out for a highway and flex run.
45. Had Jeep front-end realigned afterwards.
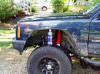
Overall, I think the pix speak for themselves. Special thanx go to thephantum
and Dale for all their hard work and tools. Thanx Guys!!!!!!